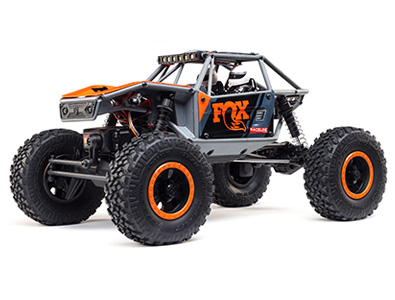
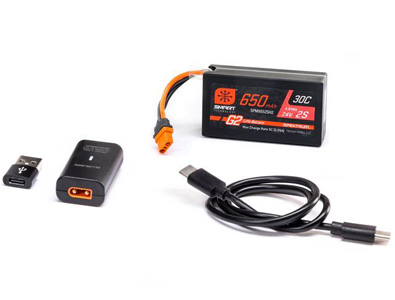
XR10 Build – Part 5 – Beadlocks
By Axial Staff on Sep 01, 2010
For this last installment of our XR10 build, I will cover the assembly of the beadlock wheels. This wheel is a completely new design. It is a true beadlock wheel, but it only requires the removal of 6 screws to change your tires. You can tune your foam or change the weight inside your wheels fast and easy. It is a real time saver when you are playing with different set-ups.
First thing we need to do is grab Bag “J” and our wheels.
Here is a break down of the parts required for each wheel.
Starting with the front wheels, we will install the internal weight rings first.
I attached the 2 halves of the rings together with one screw, inserted the weights into the center slot of the ring halves, and wrapped the ring around the wheels. It’s time to install the second weight ring screw and lock nut.
For tires we will use Pro-Line G8 Chisels.
Insert the wheel into the tire.
Then pull the beads out over the front and back of the wheels.
Now flip the wheel 180 degrees, grab the second half of the wheel, and slide it into place. There are grooves molded into both halves to keep everything lined up.
Slide the second half of the wheel all the way in until it stops.
Now flip the wheel over and set your beadlock ring into place. Line up the holes in the rings with the holes in the wheels.
You can attach the rings by hand with a 1.5mm Allen wrench. But, I suggest investing in a decent cordless driver/drill, with some small metric hex attachments. It just makes assembling the wheels so much easier and faster. I personally use Hitachi’s DB 3DL.
I set the torque on the clutch to 9, removed, and reinstalled my rock rings several times without stripping anything.
I usually start with 3 screws and insert them into the ring holes that don’t have the weight retainer ring relief cut in them. Then evenly tighten them down until the ring almost bottoms out on the wheel.
Flip the wheel over and make sure the backside bead is seated properly.
If the backside of the tire is seated properly, flip the wheel over again and tighten each screw down a few turns until all 3 screws are tight. If you try to tighten 1 screw all the way up at a time you will run the risk of stripping out your screw holes or the hex in the head of the screw.
Now insert your last 3 screws and tighten them down as needed.
The total weight of the stock wheel with the weight rings and tires installed is 12.3 ounces, a perfect starting point.
Next we will install the wheels on our freshly built XR10. Grab the four small M3 set screws, drive pins, and hexes.
Insert the drive pins into the outer axles.
Install the small M3 set screw about half way into the drive hex with a 1.5mm driver.
Next, slide the hex into place over the drive pins, and tighten up the set screw. The set screws don’t have to be tightened down with much pressure, just snug them up to hold the hex in place. Now is not the time to practice your Hulk impersonation people.
Slide the wheel over the hex and outer axles. Then tighten them down with the supplied 4mm lock nut.
There you have it. The finished product:
Well, that wraps up our box stock XR10 build, minus painting the body and installing the electronics. We will go into more detail on those aspects soon too. Only thing I changed from the manual is the rear shock ears. I moved them down one hole from what the manual suggests to level out my ride height.
Be sure to check out RCCrawler for more tips and tricks on the XR10.
Leave a Comment:
Categories
ADVENTURESAWCC
AX10
AXIALFEST
Capra
CUSTOM BUILDS
ENDURO
EVENTS
EXO Terra Buggy
FAQ
Geocache
Get Outside
International
Inteviews
KING OF THE HAMMERS
MOAB
MONSTER JAM
NEW TO R/C?
NEWS
Press
Product Release
RC MONSTER TRUCKS
RC TROPHY TRUCK
RECON G6
Ridgecrest
RR10 Bomber
RUBICON TREK
SCORE International
SCX10
SMT10
TECH
ULTRA
ULTRA 5K ENDURO
Wraith
Wroncho
XR10
Yeti
6 Comments:
Id like to thank Brandon for helping me put on my rear stear for my ax10 i wish there was some way i could send u guys a picture by the way great write up. Also id like to thank all of axial racing people for bing so helpful and for making great products thanks you guys.
Autry
Brandon,
Thanks for all of the details and excellent information, I am new to the sport and have really come to rely on your opinions and technical insights. A quick question, where do you find these long hex keys that mount into a cordless drill? I have searched and searched but no luck, thanks for the help.
DMS
Hey i was wondering if the XR10 wheels will fit on my AX10? And if so what would the off set be, and what might i need to put them on my ax10, thanks for all your help Chris
The XR10 wheels won’t really work with the AX10. They may bolt up ok, but when driving the front tires will probably rub the shocks and links when you steer. Plus, you will be very narrow as the XR10 wheels have a lot deeper offset.
I am not sure where we bought those hex drivers off hand. I will look into it more though and see if I can find the source for you.
Hey David,
Both OFNA and Hudy make a clip in bit set that you are after. The OFNA bit part number is 93119, they also have a second kit which comes with a ratcheting ball handle that comes in handy for times when a drill is to much. Hudy also makes a nice kit, part number HUD190070.
Hopefully this helps ya out.